
TL;DR:
- Effective IP lookup interpretation requires layering reputation, blacklist, proxy, and ASN data.
- Use structured, multi-signal analysis to reduce false positives and enhance security decisions.
- Regularly review and calibrate policies based on evolving threat intelligence and outcome measurement.
An unexpected login attempt lands in your SIEM at 02:00. The IP is foreign, the behaviour is unusual, and your team has seconds to decide: block it or let it through. Misread the lookup data and you either leave a real threat active or lock out a legitimate remote worker using a VPN. That gap between raw IP data and a confident security decision is where most teams struggle. This article walks you through the tools, step-by-step interpretation methods, common pitfalls, and outcome measurement techniques that turn IP lookup results into defensible network security decisions.
Table of Contents
- Essential tools and requirements for IP lookup interpretation
- Step-by-step: Interpreting IP lookup data for threat assessment
- Troubleshooting common pitfalls and mistakes in IP result interpretation
- Measuring outcomes: Using interpreted results to improve security and network integrity
- What most experts miss about IP lookup result interpretation
- Upgrade your IP lookup workflow with advanced tools
- Frequently asked questions
Key Takeaways
| Point | Details |
|---|---|
| Cross-verify reputation scores | Always check multiple databases for consistent IP risk readings before acting. |
| Prioritise ISP/ASN insights | ISP and ASN data give clearer signals about threat risk than geographic location does. |
| Avoid single-source reliance | Using only geo or blacklist data can miss sophisticated threats and create false positives. |
| Measure outcomes | Test your network's response to interpreted IP results and monitor ongoing impact. |
Essential tools and requirements for IP lookup interpretation
Now that we understand the stakes, let's examine the tools you'll need to decode IP lookup data with confidence.
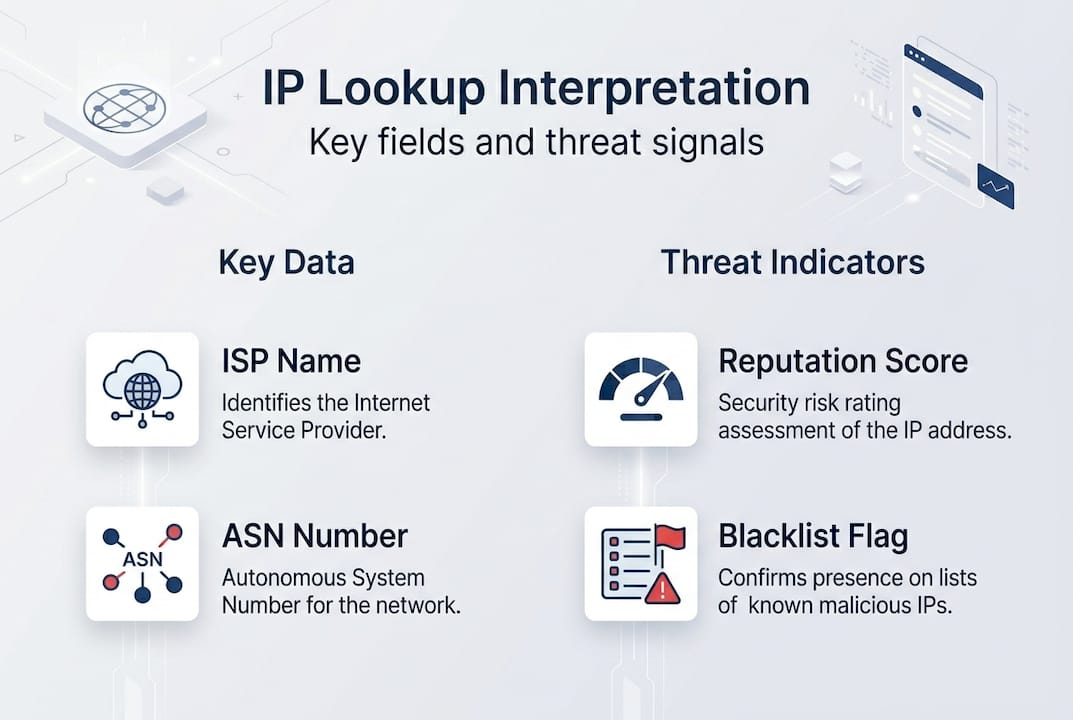
No single platform gives you the full picture. Effective IP lookup interpretation requires layering several data sources: a real-time lookup platform, a reputation database, a blacklist checker, and proxy or VPN detection. Each fills a gap the others leave open.
Here is a comparison of the core tool categories you should have in your workflow:
| Tool type | What it provides | Example use case |
|---|---|---|
| IP lookup platform | ISP, ASN, geolocation, organisation | First-pass triage on unknown IPs |
| Reputation database | Risk scores, threat categories | Scoring inbound traffic |
| Blacklist checker | Presence on known threat lists | Confirming compromised sources |
| Proxy/VPN detector | Anonymisation flags | Identifying masked origins |
Reputation scores are the backbone of threat triage. Talos reputation scores classify IPs as Good, Neutral, or Poor, with granular risk tiers, blacklist checks, and proxy or VPN flags baked in. A "Poor" rating means the IP has a documented history of malicious activity. A "Neutral" rating warrants closer inspection, not automatic trust.
Beyond reputation, you need ISP and ASN (Autonomous System Number) data. ASN tells you which network owns the IP block, which is far more revealing than a city name. An IP resolving to a major cloud hosting provider behaves very differently from one on a residential broadband network. You can identify ISP from IP address to understand exactly which organisation controls the traffic you are reviewing.
Blacklist checks confirm whether an IP appears on known threat intelligence feeds. Use a dedicated blacklist checker tool to cross-reference multiple lists simultaneously rather than checking them one by one.
Proxy and VPN detection rounds out your toolkit. Legitimate users sometimes use VPNs, but so do attackers trying to mask their origin. A proxy detection tool flags anonymisation layers so you can factor them into your risk assessment rather than ignoring them.
Pro Tip: Never rely on a single lookup source. Cross-verify reputation scores, blacklist status, and proxy flags across at least two platforms before making a block or allow decision. Discrepancies between sources are themselves a useful signal.
Step-by-step: Interpreting IP lookup data for threat assessment
With your toolkit ready, here is how to systematically approach IP lookup interpretation for robust threat assessment.
Working through IP lookup data without a structured process leads to inconsistent decisions. Follow these steps every time:
- Check the reputation score first. Talos reputation scores use a Good, Neutral, Poor scale. Good means little threat; Poor means high threat and warrants immediate escalation. IPASIS scores run from 0 to 100: 0 to 30 is low risk, 76 to 100 is high risk.
- Review blacklist status. An IP flagged on multiple blacklists is a strong indicator of prior malicious activity. One list hit may be a false positive; three or more is a pattern.
- Evaluate proxy and VPN flags. Use a VPN detection tool to determine whether the traffic is anonymised. A flagged VPN or proxy does not automatically mean malicious, but it changes the risk calculation significantly.
- Examine ISP and ASN data. This is where ASN on IP lookup becomes critical. Hosting ASNs (data centres, cloud providers) carry higher risk than residential ISPs for most threat scenarios.
- Contextualise the geolocation. Geography is the least reliable signal. Use it to flag anomalies, not to make final decisions.
Here is a quick-reference risk interpretation table:
| Signal | Low concern | High concern |
|---|---|---|
| Reputation score | Good / 0-30 | Poor / 76-100 |
| Blacklist hits | 0 | 3 or more |
| Proxy/VPN flag | Not detected | Confirmed |
| ASN type | Residential ISP | Hosting/data centre |
"Never assume you know who is behind an IP address based on location alone. The network owner tells you far more than the city." This is a principle that risk prioritisation advice from real-world geofencing failures reinforces repeatedly.
A common error is treating geolocation as identity. An IP resolving to Germany does not mean the user is German. It means the exit node or ISP is based there. For a structured breakdown of what each result field actually means, review interpreting IP lookup results before building your assessment workflow.
Pro Tip: When ISP data shows a well-known residential provider and the reputation score is Neutral, consider a step-up authentication challenge rather than an outright block. This preserves user experience while still managing risk.
Troubleshooting common pitfalls and mistakes in IP result interpretation
Once you have identified the primary threat indicators, it is vital to recognise and sidestep interpretation errors that can undermine security decisions.

The most damaging mistakes in IP lookup interpretation are not technical failures. They are analytical ones. Teams that over-rely on a single data point consistently make poor decisions.
Here are the pitfalls to watch for:
- Over-relying on geographic data. Geolocation is an estimate, not a fact. IP blocks are reassigned, VPNs shift exit nodes, and mobile networks route traffic unpredictably. Geo-fencing pitfalls are well-documented: organisations that blocked entire countries based on IP location found themselves locking out legitimate customers and partners.
- Misreading confidence metrics. Many platforms show a confidence percentage alongside location data. A 60% confidence score means the location could easily be wrong. Treat low-confidence results as directional, not definitive.
- Ignoring proxy detection. Skipping proxy and VPN checks is a significant gap. An IP with a clean reputation score but an active proxy flag should still be treated with caution.
- Assuming one blacklist hit equals confirmed threat. False positives exist on every list. One hit warrants investigation; it does not warrant an automatic block.
- Neglecting ASN context. An IP from a major cloud provider like AWS or Azure is not inherently malicious, but it is statistically more likely to be used for automated attacks than a home broadband connection.
"Never assume user identity or location from an IP address alone. Prioritise ISP and ASN data, and always cross-reference your confidence metrics before acting."
The fix is structured cross-referencing. Your cybersecurity IP lookup guide should mandate that no block decision is made on fewer than three corroborating signals. This single rule eliminates the majority of false positives and prevents the kind of over-blocking that erodes trust in your security tooling. For a deeper framework, the IP lookup cybersecurity guide covers policy-level decision trees that support this approach.
Measuring outcomes: Using interpreted results to improve security and network integrity
Having avoided common mistakes, let us see how to translate your findings into practical security improvements and measurable outcomes.
Interpreting IP lookup data is only valuable if it drives action. Here is how to convert your findings into a structured response:
- Apply risk-tier policies. Using Talos risk tiers and IPASIS scores, set automated rules: allow traffic scoring below 30, challenge traffic scoring between 50 and 75 with CAPTCHA or multi-factor authentication, and block traffic scoring above 85 automatically.
- Log every decision with its evidence. Record which signals triggered the decision: reputation score, blacklist hits, proxy flag, ASN type. This creates an audit trail and improves future model accuracy.
- Review blocked IPs weekly. Reputation scores change. An IP blocked last month may now be clean. Stale block lists degrade network performance without improving security.
- Measure false positive rates. Track how often blocked IPs generate legitimate user complaints. A rising false positive rate signals that your thresholds need recalibration.
- Report outcomes to stakeholders. Security decisions need to be visible. Monthly reports showing threat volume, block rates, and false positive trends build organisational confidence in your process.
Here is a summary of the risk-tier action framework:
| Risk score | Risk level | Recommended action |
|---|---|---|
| 0 to 30 | Low | Allow |
| 31 to 49 | Moderate | Monitor |
| 50 to 75 | Elevated | Challenge (MFA/CAPTCHA) |
| 76 to 84 | High | Restrict and investigate |
| 85 to 100 | Critical | Block automatically |
The cybersecurity professionals guide provides additional policy templates that map directly to these tiers.
Pro Tip: Set a quarterly review cycle for your IP reputation policies. Threat landscapes shift, and a policy built on last year's data will develop blind spots. Treat your block and challenge rules as living documents, not permanent configurations.
What most experts miss about IP lookup result interpretation
Stepping back from the tactical steps, here is a viewpoint that challenges prevailing IP lookup interpretation practices.
Most security teams treat IP lookup as a binary exercise: is this IP bad or not? That framing is the root cause of both over-blocking and under-detection. The reality is that IP reputation is contextual, not absolute.
An IP from a data centre ASN with a Neutral reputation score looks unremarkable in isolation. Pair it with a proxy flag and three blacklist hits from the past 90 days, and the picture changes entirely. The mistake is evaluating signals sequentially rather than holistically. Experienced analysts know that combining ASN, proxy, and reputation signals produces intelligence that no single metric can match.
There is also a persistent over-reliance on blacklists as a primary defence. Blacklists are retrospective. They tell you about yesterday's threats, not today's. An attacker rotating through fresh IPs will evade every blacklist check while still showing hosting ASN patterns and proxy flags that a holistic review would catch.
The stronger approach is to weight your signals by reliability: ASN and proxy status first, reputation score second, geolocation last. Use ASN lookup for IP address data as your primary filter, and treat geography as supporting context only. Teams that make this shift report fewer false positives and faster genuine threat identification.
Upgrade your IP lookup workflow with advanced tools
Ready to automate and enhance your threat assessment process? The techniques covered in this article become significantly more efficient when supported by integrated tooling that handles reputation scoring, proxy detection, and blacklist checking in a single workflow.
InstantIPLookup.com brings these capabilities together in one place. Use the IP lookup tool for real-time triage, connect to proxy server detection to flag anonymised traffic instantly, and follow the structured lookup guide for professionals to build policy frameworks that scale with your organisation. Faster decisions, fewer false positives, and a cleaner audit trail start here.
Frequently asked questions
Which risk scores should I trust when making network security decisions?
Scores from Talos and IPASIS are widely trusted; use 0 to 30 for low risk and 76 to 100 for high risk, and always corroborate across at least two platforms before acting on a single score.
How do ISP and ASN information help reduce false positives?
ISP and ASN data reveal whether traffic originates from a hosting versus residential network, which prevents you from blocking legitimate users based solely on an imprecise geographic location.
Why cross-reference blacklist, proxy, and VPN flags when interpreting IP lookup results?
Threat actors often appear across multiple signals simultaneously; checking all three reduces both missed detections and the accidental blocking of clean IPs that appear on a single outdated list.
What is the role of confidence metrics or polygons in interpreting results?
Confidence metrics indicate how reliable a location or risk score actually is; low-confidence results should guide cautious, investigative responses rather than automatic enforcement actions.